Hello there my name is Vynie and I thought it would be interesting to watch myself progress as a painter over the years. I have been painting models for roughly a year now and have some interesting things to share with the community hope you enjoy :)
Article 1: Ulthwe Farseer on Bike Conversion And painting

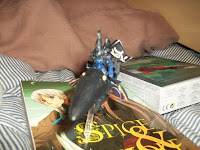
So The conversion work was using the two kits above. I used a dire avenger power weapon for the farseer's singing spear and the shimmer shield for the other arm. It took some cutting and edits here and there but worth it. so the robe on the rider (high elf archmage) had a robe behind him that was in the way of the seat and didn't sit flush with the jetbike. I then found my farseer from the seer and warlock pack. never use her as she is missing an arm :/. used her ghosthelm for the riders head and used games workshop super glue to stick the head and revil glue to stick the plastic parts. there is a massive tube of plastic that sits under the mage rider. usually connects him to his horse so cut this about half way and then glue. sorry I don't have pictures from start to finish she isn't finished and I only found my camera when I had got to this stage. anyway the next step was priming the parts and putting the bike together. I would recommend not gluing the top part of the bike until the painting is finished. also I would recommend not gluing the rider to the bike and the spear arm to the rider. Don't bother gluing the base to the bike or stand to the base there's no point and its more likely to break glued.


Now onto the fun stuff :) the painting. now I am an average painter not that great but also not bad for the year I have been painting models. I seem to have run before I walked though learning crystal blending, blending, metallic blending rather then highlighting, layering, Proper dry brushing and things like that I am sure a very close friend would agree ;) so I primed the parts black using Games Workshop's Chaos black spray paint. after this I set about getting my head around where the heck I would start and decided to get the free hand out of the way first. I highlighted the unattached robe Codex Grey citadel paint and realised how light it would look. I highlighted the entire robe Codex Grey and then decided what if I brought the highlights to low lights instead of my usual low light to highlight. I mixed about 1:10 ration of Chaos Black to Codex Grey. I then slowly brought it to about a 3:2 mix of Chaos Black Codex Grey leaving less of the previous layer each time. About a 5 stage highlight looked okay but then Google searched Ulthwe Farseer and saw the amount of white people used on the highlighting so followed suits and brought it up with some Scar White. Next I did a free hand Ulthwe symbol that I am pretty proud of. Main idea behind getting good free hand such as the one on the cape is remember you can fix mistakes. I went over any of the Bleached Bone I messed up with the original base coat sometimes I put it on bad on purpose for example the tear was just a blob of bleach bone that I painted around. After I was happy with the robe I decided to free hand a symbol on the bike front. failed as it looked very odd so removed the paint and left it for a while. I looked back and RE base coated it in chaos black then I have not done anything else to it yet.


Now the bikes seating, engines and the rest of it. so my firs thoughts where what compliments black really well? I thought of red and set out drawing fire patterns on the engines of the bike. I used Khorn Red blended through Mephiston Red into Blazing Orange Two mixes then through Fire Dragon Orange once again mix this in twice (not sure of the ratios) then brought it through Yuriel Yellow to White. then I had my flames as easy as that. I highlighted the engines white where the fire was and codex grey in the other spots. For the seat was a simple Khorn Red base coat with a Mephiston Red highlight I plan to wash it Bal Red. Next job was the gems. I did them in Bleach Bone using my gemming technique and glazed them yellow. gave a lovely soft yellow finish :)

That about covers it so far. I hope you enjoyed this and it gave you some hints, tips or ideas to help with a conversion or paint job you may be doing. thanks for reading.
Fly


